


Process for Onboarding Nextiva
Here are the steps for onboarding Nextiva at an office:
Gathering Information
-
Reach out to the Doctor or Office Manager to see if the would like to set up an initial call to gather information or if they would be comfortable filling out a form.
-
If they would like a phone call, follow this practice questionnaire to ensure you get all the information needed during the call - Asana Nextiva Information Submission
Create Practice Location in Nextiva

-
The location will need to be created in the Nextiva portal before moving forward.
-
This information will be used to bill for the phones and users.
-
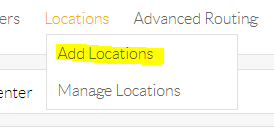
In your portal, you will hover on the Locations tab at the top of the screen.
-
Click Add Location.
-
Here you will add the following information:
-
Location Name: Office name
-
Description: Office name
-
Location Outgoing Number: Add a temporary number for the time being
-
Location Caller ID: Office name
-
Time Zone
-
Address
-
-
Click Save & Continue
-
Once saved, you can verify that the location features are turned on that the office has requested. This includes, group pick up, music on hold, etc.
Requesting Users & Ordering Phones
-
The next step after getting your information is to request users and order phones.
-
Our contact at Nextiva is Nathalie Crane - [email protected].
-
When emailing her with this request, include the following information:
-
Account number
-
Billing email
-
Location
-
Number of users
-
Number of phones (include model numbers needed)
-
Any temporary numbers that may be needed
-
-
She will respond with a quote number that has been sent over to Robert for approval.
-
Once approved, you will receive tracking numbers for the phones.
-
The users will be available for assignment.
Adding Users
![]()
-
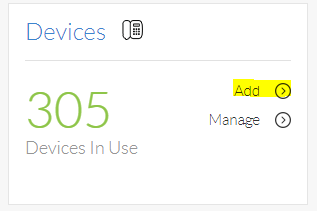
Before attempting to add new users, verify that the requested number of new users has been added to the Nextiva portal. You can check this by looking at the Users square on your dashboard.

-
If the correct number of users are available, you can continue adding each user for the location.
-
During the initial phone call with the office, they should give you a list of what they would like each user to be named.
-
When adding users, you will need the following information:
-
First name
-
Last name
-
Username: extension.office (ex: 3260.dpd)
-
Email: use your email address
-
Location: use the drop down menu to assign the user to the correct location
-
Time zone will populate based on the location chosen
-
Extension
-
Uncheck the box for welcome email
-
Click save and continue
-
-
After saving, it will ask you if you’re ready to assign the user a device.
-
If the devices have arrived, you can assign them here. If not, you can select no and save the user without a device until they arrive.
Assigning Devices
![]()
-
When assigning devices, you will need the make, model, and MAC address of the device.
-
That information can be found on the box the device arrives in, or on the back of the actual device.
-
When ordering phones from Nextiva, they typically assign them to a sub-account of the location they were ordered from. Robert can get you that login information for those subaccounts.
-
You will then need to login to those accounts and delete the devices from that portal.
-
This will allow you to add them to the main Nextiva portal.
-
To add a new device you will click on the add button from the device square.
-
You will then select the model of the phone you are adding. (ex: X-815 or X-835)
-
After selecting the model, you will enter the MAC address.
-
The click Assign.
-
It will provide you with a drop down of available users that you can assign each device to. You can either add the users to the devices this way or through each user directly.
-
To do this, you will search the user.

-
Click on the Device tab under the user’s information.
-
From there, you will search through the available devices and add the correct one to the user.
-
The Authentication Name will auto populate with the users Username and you will click Generate to create a Password for the device.
-
You will do this for each user that requires a device.
Assign User Features
-
Certain features will automatically be turned on for each user when they get added in.
-
When you complete the initial questionnaire with the office, you will verify with them what features they would like each user to have.
-
This can include voicemail, do not disturb, call forwarding, etc.
-
Make sure the features they want are turned on for each user.
-
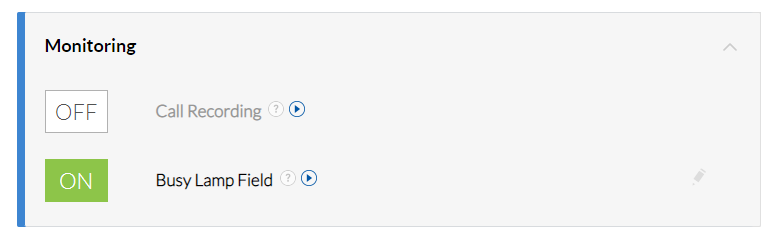
While editing each user, you will also assign the Busy Lamp Fields.
-
This can be done by expanding the Monitoring section of the user information.
-
Click on the pencil to edit the busy lamp field.
-
Once expanded, you will then add each other user from the office into the Monitored Users box.
-
Click save after all your users are added.
-
If the device is currently on, it will reboot after clicking save.
Office Hours and Creating Schedules

-
Verifying office hours and after hours forwarding schedules is very important. Some offices want their phones to go straight to voicemail after hours and some want it to forward to an on-call doctor number.
-
To create a schedule for an office, you will follow these steps.
-
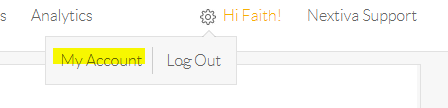
You will hover over your name, and click on my account.
-
From there, you will click on schedules.
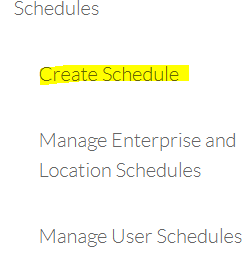
-
Then click on Create Schedule.
-
Create the name for the schedule. Typically you will make a business hours schedule and an after hours schedule.
-
When creating a business hours schedule:
-
Name it Business Hours
-
Type will be regular
-
Level will be Location
-
Location will be the location that you are creating the schedule for.
-
Click Save
-
You will then use the sliders to adjust the hours.
-
If an office is closed on a certain day, click the closed check box.
-
-
You will repeat the same steps for creating an after hours schedule, but when you get to the schedule details, you will click the checkbox that says Flip Slider (After Hours/Lunch Break).

Creating a Call Group

-
To create a call group, you will hover over Advanced Routing and click on Call Groups.
-
Once here, you will click on Create Call Groups on the left.
-
You will need the following information to create the call group:
-
Call Group Name
-
Select the location from the drop down menu.
-
Caller ID First Name
-
Caller ID Last Name
-
Phone Number (This will be the same as the temporary number that you selected for the location)
-
Extension
-
Call Distribution Policy: This will most likely be Simultaneous.
-
Add the selected users to the call group. (These will be the users that will receive incoming calls for the location.)
-
Click the arrow to drop down the Advanced Settings.
-
Busy Options: Select Allow Call Waiting.
-
Check the box next to Forward call after.
-
15 seconds
-
Forward to will be *55 plus the extension of the user that will receive the main office voicemails. (ex: *553020)
-
-
Check the box next to Enable call forwarding when no reachable.
-
Forward to the same extension that you entered above.
-
-
Display on incoming calls: Call ID Only
-
-
Click Save & Continue.
-
If an office has requested that their after hours calls go straight to voicemail after hours, follow these instructions:
-
Still in the call group, expand the Forwarding menu.
-
Click on the pencil next to Call Forward Selective.
-
Default Forward Number: *55 + the extension of the user that will receive voicemails.
-
Click Save.
-
Click the + sign.
-
Enter the following information:
-
Description: After Hours
-
Forward to: Forward to Specified Number
-
Forward Number: *55 + the extension
-
Regular Schedule: After Hours
-
Click Save Criteria.
-
-
Voicemail should always be enabled for the call group.
-
Creating an Auto Attendant
-
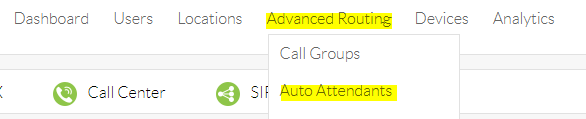
Hover over Advanced Routing and then click on Auto Attendants.
-
On the left hand side of the screen, you will click on Create Auto Attendant.
-
Here you will enter the following information:
-
Auto Attendant Name
-
Select the Location from the drop down menu.
-
Pick which schedule you would like the auto attendant to follow.
-
Business Hours
-
After Hours
-
Every Day All Day
-
-
Phone number
-
If using the auto attendant during business hours, you will need to un-assign the number from the call group and add it to the auto attendant.
-
-
Extension
-
Advanced Settings:
-
Caller ID First Name
-
Caller ID Last Name
-
-
Save and Continue
-
-
If creating an auto attendant to play during business hours, but to forward to a voicemail box during after hours, follow these steps:
-
Schedule to follow will need to be set to Every Day All Day.
-
Drop down the Business Hours Menu.
-
Here you will add the options for the auto attendant.
-
Example: Press 1 for scheduling:
-
Key: 1
-
Description: Scheduling
-
Connect to: Number/extension
-
Connection Data: enter user or call group extension.
-
-
Click Save.
-
-
The After Hours Menu will stay blank.
-
Drop down the Forwarding menu:
-
Default Forward Number: extension of the voicemail box after hours call will go to.
-
Click the + to add in the forwarding schedule.
-
Description: After hours
-
Forward to: Forward to Specified Number
-
Forward Number: voicemail box extension
-
Regular Schedule: After Hours
-
Save Criteria
-
-
Make sure the ON button is green.
-
-
-
If creating an auto attendant to play during business hours and after hours, follow these steps:
-
Drop down your Business Hours Menu and fill that out accordingly.
-
Then you will drop down the After Hours Menu and fill out that information.
-
If using an auto attendant to forward to an on-call doctor number after hours, instead of entering the voicemail box extension under Connection Data, enter the on-call doctor number.
-
-
Save each section.
-
You will not need to add in a forwarding option.
-
Uploading Greetings
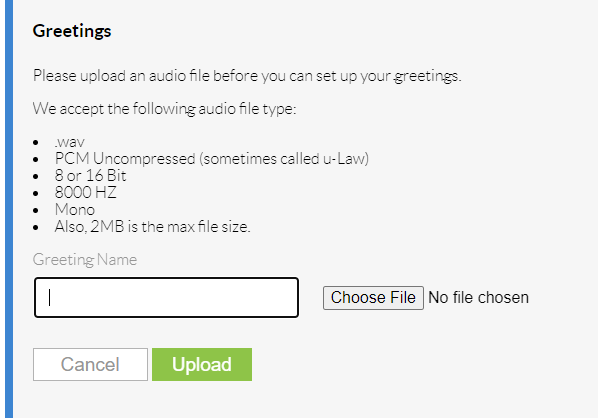
Before uploading audio files, they must be converted. Here are the specifications:
-
.wav
-
PCM Uncompressed (sometimes called u-Law)
-
8 or 16 Bit
-
8000 HZ
-
Mono
-
2 MB is the max file size
Link to the website to use to convert files:
https://audio.online-convert.com/convert-to-wav
Users
-
After converting the file to the correct format, you will search for the user you want to upload it for.
-
Scroll down to the Greetings tab and expand it.
-
Type in the name of the greeting that you are going to upload.
-
Click Choose File to select the audio file.
-
Then click Upload.
-
If there are any issues with the file type, you will get an error message when trying to upload.
Locations
-
Search and click on the location you are uploading the greeting for.
-
Scroll down and expand the Announcements tab.
-
Click Upload File at the bottom of the tab.
-
Name the announcement and upload the file.
-
Then click upload.
Call Groups
-
Search and open the call group that you are uploading the greeting for.
-
Scroll down and expand the greetings tab.
-
Under Manage Greetings, click Upload a New Greeting.
-
Name the greeting and upload the file.
-
Then click Upload.
Testing Phones
-
Take each phone out of the box and plug in the power cable and an ethernet cable.
-
Make sure each of them powers on and provisions correctly.
-
Ensure that each device shows the correct information for the user/extension assigned to it.
-
Once each phone boots up, verify that the busy lamp fields are assigned and populating.
-
You will then need to call the location’s temporary number from a cell phone or another device to ensure that your call groups or auto attendants are programmed correctly.
-
Call Groups - make sure the selected users/devices are ringing in for incoming calls.
-
Auto Attendants - make sure the correct devices ring when entering the corresponding number key.
-
-
You all also need to test call transfers between devices.
-
Test any features that the locations may have requested, i.e. group paging, group pickup.
Populating Directory
-
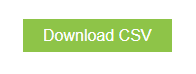
From your dashboard, go to manage users.
-
Click the Download CSV button.
-
This will download an excel spreadsheet of users and extensions in nextiva.
-
Copy and paste the users for the specific location into a new excel sheet.
-
You will only need the Names and Extensions.
-
Save this sheet as a CSV (Comma Delimited) type.
-
Follow these steps to get the IP address for the device:
-
Press Settings
-
Click down to Information
-
System Info
-
Take note of what the IP Adr is listed as.
-
-
After getting the IP address of the device, you will search for that in your browser.
-
This will bring up the web interface for the device.
-
On the left hand side of the screen, you will click on Directory.
-
Scroll down to where it says Import Directory (CSV).
-
Click Choose File and select the excel sheet that you just saved.
-
The select Load.
-
You will use the drop down menus above each section to determine how it’s saved or if you want to ignore that section.
-
Then Click Save.
-
Once saved, you can view the directory list to see if the information is populated correctly.
-
Complete this for each device.
-
Once finished, you can close the browser.
-
Verify each directory loaded into the phones.
-
Click the directory button on the device.
-
Submitting Porting and Spoofing Requests
Porting
-
Before submitting a porting request, you will need a copy of the location’s most recent phone bill. Once you have that, you can move onto the next steps:
-
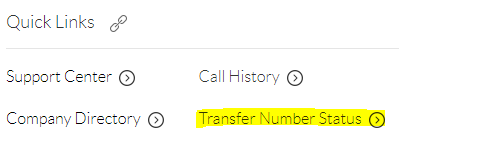
From your Dashboard, click Transfer Number Status
-
Then click on Local LOA.

-
A new browser tab will open up to Docusign.
-
Enter your Full Name and Email address, then click Begin Signing.
-
Once the document loads, you will add in the following information:
-
Choose your type of port, Standard or Requested.
-
Click the Initial buttons next to each requested line. (There should be three)
-
Caller ID: Office name (This can only be 15 characters)
-
Check the box next to Yes for the most recent phone invoice.
-
Click the paperclip to upload that document.
-
Additional Information: List out the numbers to be ported and if they are voice or fax.
-
Click the Sign button.
-
One the next page, you will fill out the following fields:
-
Nextiva Account Name
-
Nextiva Account Number
-
Billing Telephone Number
-
Current Service Provider
-
Account Name
-
Service Address, City, State, Zip
-
Account Number
-
PIN (some service providers require this)
-
Check the bubble next to yes or no for more than 15 numbers
-
Enter each number and whether it’s a voice or fax number
-
-
Click the Sign button.
-
-
Click the finish button to submit.
Spoofing
-
Enter your Full Name and Email Address.
-
Click Being Signing.
-
Click the paperclip to upload a copy of the most recent phone bill.
-
Next you will enter the phone number of the location in the left column and the user’s name in Nextiva in the right column.
-
Check Yes or No for submitting more than 15 users.
-
Check Yes or No for any additional documents.
-
Enter the Nextiva Account Name and Account Number.
-
Click Sign.
-
Then click Finish to submit the spoofing request.
Before Installation
Here is a list of things you will need to do before the installation:
-
Create a folder with a user guide with a cover page that lists the users and their extensions, temporary number, and who to contact if they have questions.
-
Create extension cheat sheets for each user. (there is a laminator in the copier room)
-
Schedule installation date with the practice.
-
Call the current phone provider to verify that call forwarding is a feature on their account.
-
Gather equipment that you need for installation:
-
Phones
-
Surge Protectors
-
Switches
-
Ethernet Cables
-
Wi-Fi Adapters
-
Toolbox (screwdriver set)
-
Practice user guide
-
Extension cheat sheets
-
Business Card
-
Installation
-
Do not install all phones at once, if something goes wrong you want to ensure that the office can still receive patient calls during the transition.
-
Start with one device - when this device boots up, enable call forwarding on the old phones to the temporary number and test to make sure it worked properly.
-
Call the main office number from your cell phone.
-
If the Nextiva phone rings in, then you’re okay to move on to installing the remaining phones.
-
If the old phones continue to ring in, you may need to contact the current phone provider to help enable call forwarding.
-
-
Once call forwarding is set up and working correctly you can move on to installing the remaining phones.
-
After all devices are installed, test to see that calling and other features are working.
-
You will then proceed to training the staff on how to use the new phones and how to navigate through the different buttons and menus on the phones.
After Installation
-
Make sure that you are available to help with any issues or questions that the office may have after installation.
-
Ensure that they are happy with the transition!
Here is a checklist that you can use to verify that each step gets completed:
Other documents that are Nextiva related:

