

Features Guide
Questions? Contact: Pepperpointe IT ex: 9000 or [email protected]
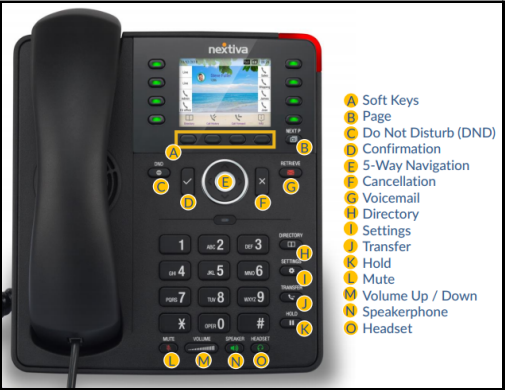
(Nextiva X-835)
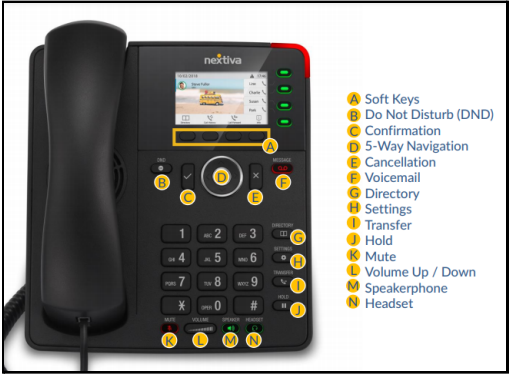
(Nextiva x-815)
Table of Contents
Main Features
Call Groups 4
Hanging up 4
Placing Calls on Hold 5
Transferring Calls 6
Voicemail 7
Accessing Voicemail From Another Phone 8
Extended Away Greetings 9
Call History 10
Directory 10
Busy Lamp Fields 11
Call Forwarding 11
Schedules 12
DND 12
Settings 13
Optional Features (can be added per office request)
Call Parking 15
Group Pick up 16
Auto Attendants 16
Headsets 17
Announcements
Greetings 19
Call Groups
-
Call groups route incoming calls to a specified group of users.
-
These calls can be set up to ring in simultaneously or circularly.
-
Call groups allow for call waiting and if no user is available to answer an incoming call, the calls can be routed to voicemail after a set number of seconds.
**The office will determine which users will be added to the call groups for each location.
Hanging up:
-
As you may notice, your Nextiva phone does not have a “hook switch” that will automatically hang up your call.
-
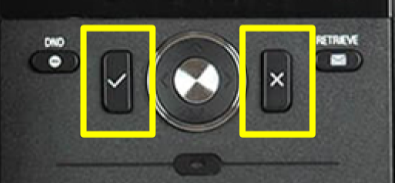
After hanging up the receiver, to ensure a call is successfully hung up, you will press the X key located above the number pad.
-
The Confirmation (check mark) key can be used to answer incoming calls. This will place the call on speaker phone until the receiver is picked up.
Placing Calls on Hold
-
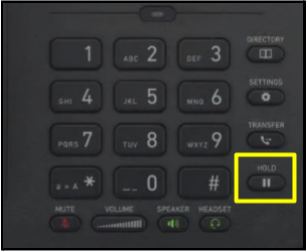
While on a call, press the hold button on the phone.
-
Once you press the hold button it will confirm on the screen that the call is placed on hold.
-
You can hang up the receiver while the call is on hold.
-
To answer the on-hold call, press the hold button again.
Transferring Calls
Warm Transferring Calls
A warm transfer allows Users to speak privately with the receiving party before transferring the call. It also confirms the availability of the receiving party.
-
While on a call, press the Transfer button.
-
Dial the phone number/extension or soft key of the receiving party.
-
Once the receiving party answers, advise them of the incoming call.
-
Press the Transfer button.
-
Once the transfer goes through, you may hang up the receiver.
Blind Transferring Calls
A blind transfer involves transferring the call to another number or extension without speaking to the receiving party, regardless of whether they answer.
-
While on a call, press the Transfer button.
-
Dial the phone number/extension or soft key of the receiving party.
-
Press the Transfer button again.
-
You may then hang up.

Voicemail
The Voicemail portal allows Users to:
-
Record voicemail greetings for callers to hear before leaving a message.
-
Listen to Voicemail messages.
Setting up Voicemail
-
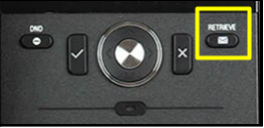
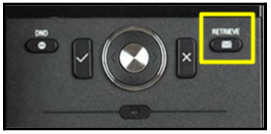
From your phone, press the Retrieve button.
-
You will be prompted to enter your PIN. (Default PIN is 0000#)
-
You will then be prompted to create a new personalized 4-digit PIN.
-
After changing your PIN, you will be prompted to record a personalized name greeting.
-
Record your name greeting, and press * to save.
Checking Voicemail
-
From your phone, press the Retrieve button.
-
Enter your PIN and then #.
-
Press option 1 to listen to new or saved Voicemails.
Accessing Your Voicemail from Another Phone
Accessing VM from another Nextiva Phone:
-
From your Nextiva phone, press the Retrieve Voicemail Button.
-
When the greeting begins to play, press the * (star) key.
-
When prompted to enter your Mailbox ID, this will be the extension of the phone the original voicemail box is on.
-
Enter that number and press the # key.
-
Then you will enter the PIN of that voicemail box.
-
You will then be connected to that voicemail box and can check voicemail as usual.
Accessing VM from a non-Nextiva phone:
-
Dial the business phone number.
-
When connected to the voicemail greeting, press the * key.
-
At the prompt to enter the PIN, press the * key again.
-
Enter Mailbox ID (extension) of the vm box, then press #.
-
Enter the VM PIN, followed by #.
Extended Away Greeting
Turn on Extended Away Greeting:
-
Press the RETRIEVE VOICEMAIL button on the phone.

-
Enter your PIN and press #.
-
Select Option #1 - to access your voicemail box.
-
Select Option #4 - to access your extended away greeting.
-
Select Option #1 - to activate your extended away greeting
-
Select Option # 3 - to record a new extended away greeting.
Turn off Extended Away Greeting:
-
Press the RETRIEVE VOICEMAIL button on the phone.
-
Enter your PIN and press #.
-
Select Option #1 - to access your voicemail box.
-
Select Option #4 - to access your extended away greeting.
-
Select Option #2 - to disable your extended away greeting.
-
Select Option #3 – to record a new extended away greeting.
(Disabling your extended away greeting will change your voicemail greeting back to your original busy greeting.)
Call History
Accessing Call History
-
Press the soft key under Call History on your phone screen.
-
Press the left or right arrows to navigate through the different views.
-
All
-
Missed
-
Received
-
Dialed

Directory
Your phone directory will come already programmed.
This directory consists of important extensions that you may need quick access to.
To access the directory from your phone, you will press the soft key that is associated with “directory”. This will pull up a list of extensions. To call, just press the confirm key and your call will be initiated.
Busy Lamp Fields
Busy lamp field allows you to monitor the call status of another user in your office. Different call statuses including idle, incoming call, on a call, or call on hold are represented by a color-coded line key light; these line keys are set up to display the names of the selected users.
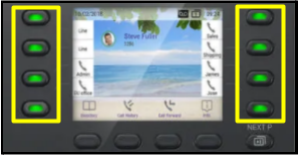
The Users name will be displayed on the screen next to their corresponding key.
Call Forwarding
Location Forwarding
Forward all incoming calls to an alternate number.
-
Press the soft key under Call Forward on your phone.
-
Insert number for calls to forward to.
-
Press the save button.

Schedules
Schedules can be set up to route calls based on the day and time.
These schedules can include:
-
Business Hours
-
After Hours
-
Holiday Closures
These schedules can be changed at any time.
**If your office hours change, please let me know so I can adjust your schedule.
Do Not Disturb
Activating DND on your phone will automatically send all incoming calls to Voicemail instead of ringing into the phone.
This can be used during lunch times to route calls to voicemail when users are unavailable to answer calls.
This button is located to the left of the Checkmark key on your phone.
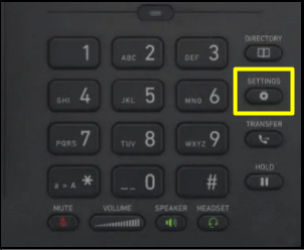
Important Features in Nextiva Settings Menu
Preferences
-
Language
-
Date & Time
-
Audio
-
Ringer (change the ringtone for your phone)
-
Volume settings
-
-
Display
-
Color (change the background color)
-
Themes
-
Optional Features
(Can be added per office request)
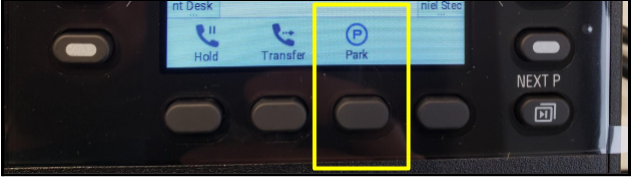
Call Parking
Call parking allows Users to place an active call on hold and park it on an available extension instead of transferring. This allows the recipient to take the call when they are ready. Any member that is in the call parking group can retrieve this call; they just need to know the extension that the call is parked to. After you have parked a call, you can make and receive calls freely and invoke any other features.
Parking the call:
-
While on a call, press the soft key that is associated with the Park button on your screen.
-
You will be prompted to enter the extension that you want to park the call on.
-
Enter that extension and press #. (You can now hang up)
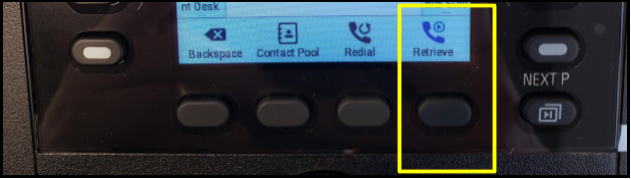
Answering the parked call:
-
To answer the parked call, you will pick up the phone and press the soft key associated with the Retrieve button on your screen.
-
It will prompt you to enter the extension the call was parked to.
-
Enter that extension and press #.
Group Pickup
Call pickup groups allows users in these groups to answer any ringing line in their group on their own phone.
To pick up a call using call pickup, press the designated soft key and the call should come to your device.
If pressing the designated soft key doesn’t work, you may need to dial *98 to accept the ringing call on your device.
Auto Attendants
An auto attendant allows incoming calls to be transferred automatically to the extension the caller chooses without the need for a physical receptionist. For example, a caller can press 1 for scheduling, 2 for insurance, etc..
Headsets
Nextiva phones are compatible with headsets.
These can be purchased directly by the office as needed.
https://www.factoryoutletstore.com/cat/20143/Plantronics-CS-Series.html
Location
Announcements
Greetings
Voicemail greetings can be customized to fit your office.
Voicemail greeting types include,
-
Busy greetings
-
After hours greetings
-
Extended away greetings
I have found that the easiest way to customize your voicemail greetings is through uploading an audio file to your account. This can be done by recording a voice memo on your cell phone or computer and emailing it to me. I can then convert your file and upload it to the correct location of your portal to play during the specified time.